Rather than explain my multi-year hiatus, I’ll just jump right in with a video
demonstrating how I hurl insulin. I’m sure you can fill in the blanks on
how things have been going since my last update…
I was describing to someone new to diabetes how I “chuck my pen like a dart”,
and realized that my silly metaphor was causing confusion instead
of providing reassurance on how easy injecting insulin can be.
A couple points:
Insulin pens are awesome and syringes give me the willies.
Hold the pen like a dart, lightly between your fingers.
With the cap on, practice pretending to “throw” the pen like a dart.
A single, smooth motion moving at a reasonable pace.
Do NOT put the needle up to your skin and push it in.
I much prefer my hips or the side of my fat tire to my belly.
With this, 99% of the time I don’t feel the injection at all, and wouldn’t know that I had just poked myself if I wasn’t watching.
I have been field testing crystal cat litter for 6 months. “Crystal” cat litter is made from Silica, just like those little packets of crystal beads with the warning “do not eat!” you often find in packaging to keep things fresh.
They are simiar enough that I’m lumping them all together and will call out any important differences.
Clumping
Crystal litter does not clump which is a big difference from most litters. The way it works is that you scoop out any “solids” and the “liquids” are absorbed by the crystals which are replace regularly. FYI, I love euphemisms for poop and pee! :–)
Silica is extremely absorbant and holds many times its own weight in urine. It starts out clear/white and each time you scoop, you stir up any yellow spots to spread it out and prevent their favorite corners from becoming saturated while other parts of the box go unused. After a 2-3 weeks, when the litter is a uniform light yellow, I dump the entire box, scrub it and start over.
Odor Control
Each of the brands include some extra ingredient to deal with urine odors. I don’t notice any fragrance or smell from the fresh litter, which is my preference. I want my house to smell like I don’t have cats, not like their litter, even if it is clean!
None of the brands covered up the smell of poop as well as traditional litters. I believe that’s because the crystals don’t completely coat and cover like clay. I find that after scooping, I have to immediately take out the trash and can’t get away with putting it in a temporary trash can like I could with clay. Not a huge issue for me since it’s 2 steps to the trash chute.
I was pleasantly surprised at how well the crystal litter dealt with the urine odor. As long as I stirred the box when I scooped, I never smelled the urine, even towards the end of the “litter cycle” when the litter was almost ready to be changed. Maybe that means I could go even longer between changes but once it looks yellow, I can’t help but change it.
Weight
This is the best part of this litter. It is very light. Normally I put 40lbs of litter in the box at a time (it’s a big box for my Maine Coon) and now I only need about 20 lbs.
One quick note is that many of the brands suggest only using 1.5 inches but I find that is just not enough. So I end up using more per box than what the manufacturer recommends. Maybe my cats are just prolific pee-ers but unless I use about 3 inches, I find that their urine soaks all the way to the bottom of the box which makes cleaning more difficult.
Dust
This is one area where the brands differed. Dr. Elsey’s by far has the least amount of dust, both when pouring and scooping. ExquisiCat came in second. Petco Crystal litter has the most dust, especially when I’m stiring up the pee spots. I would say of all the types of litter I have tried so far (clay, corn, wheat, walnut) that this has the least dust.
Another difference was in crystal size. Dr. Elsey’s has very small fine crystals which is best for fishing out the turds as I don’t have to sift or shake the scoop which helps prevent kicking up dust. ExquisiCat’s crystals were just too big, making it exteremely difficult to scoop. If you go with that brand I recommend finding a scoop with very large spaces between the tines. Petco Crystal litter is in-between. Sometimes I get crystals stuck in my scoop (a litter lifter) but for the most part, the crystals fall through with 1-2 shakes.
Tracking
I have found that the crystals do track out of the box but don’t make it very far before working themselves loose. Traditional litter would find its way throughout my house but with the crystal I only need to sweep the first 10 feet from the box. I haven’t noticed any dust making its way out of the box or sticking to the cats feet.
With both the clay and walnut litter, I had to clean my cat’s feet to remove the dust which clings and clumps in-between their toes. I was briefly concerned that the cats would eat the crystals or have trouble from licking it from their feet but luckily that has not been an issue.
Price
As always, these alternative litters are more expensive than clay… The most expensive litter is Dr. Elseys at $1.8/lb. Which explains why even though it is my favorite, I have settled on the Petco litter, which can be purchased in bulk at $1/lb.
Final Thoughts
I am quite happy with the crystal litter. Overall it seems healthier than the clay as I hear fewer kitty sneezes after they use the box and it doesn’t stick to their feet (and end up eaten when they clean their paws). I do wish that I could remove the urine as well each time I scooped the box but I think that’s a trade off as clumping litters all get stuck in my cats’ fur…
If you decide to give it a try, let me know how it goes or if you find a good brand. I do wish I could find Dr. Elsey’s in bulk as that is my favorite but I go through enough litter than I can’t justify paying almost 2x as much for it.
The internet has probably invented this already and with a better name to boot. But I don’t care. I threw this together in my kitchen late one desperate night. See I have been cutting out dairy for the past 2 months, in the hopes that it would help with my chronic stuffed nose. It’s been a rough, mouth-breathing fall and I needed dessert!
Ingredients
1 can of full fat coconut milk, mine has 15g per 1/3 cup serving
2 tbsp of peanut butter
1 square (1 oz) of baking chocolate
2 tbsp cocoa powder
4 scoops (168 mg) of pure Kal stevia
Steps
Pour the liquid from your coconut milk into another container for later. This leaves me with about ¾ of a can of solid coconut fat. If yours doesn’t do this… you don’t have a good brand of coconut milk and should find one with more fat. I am using the Jewel (Albertsons) store brand, which is cheap to boot. Lucky me!
Put the coconut fat in a small food processor or in a container for use with an immersion blender. Mix until smooth.
Melt the baking chocolate in the microwave. Mine takes 1 minute on high.
Combine the remaining ingredients and mix.
I usually add back 2 tbsp of the coconut liquid if it is too thick to mix well.
Taste for sweetness and adjust as you see fit. Also if you really don’t like the flavor of coconut oil (I don’t!), more peanut butter will hide it.
Portion into containers and leave in the refrigerator for 1 hour to set. I usually get 4 ½ cup portions.
It comes out with a smooth, creamy soft fudge consistency. I cannot resist this stuff!
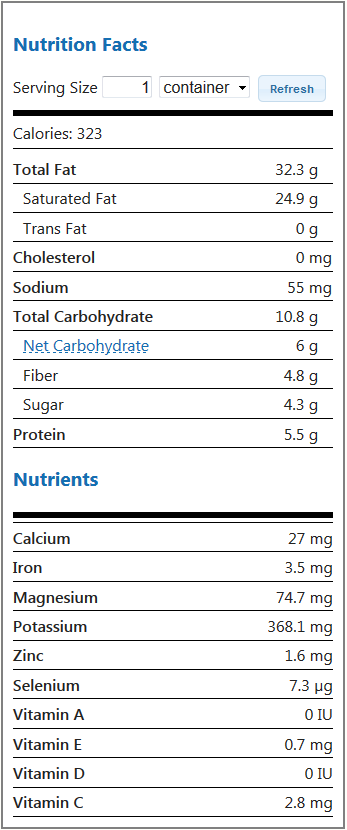
Nutrition Info
I am not convinced that the carb count is correct on this. Maybe it is the high fat but I don’t get a spike as I would expect from ~10g of carbs. Perhaps most of the carbs in coconut milk are in the liquid? I am not sure…
I am moving my blog off of WordPress and Feedburner. Unfortunately I made the mistake of using Feedburner’s URL for my feed instead of figuring out something that wouldn’t go away when I (inevitably) moved to a new service… From now on I’m using my own URL so it shouldn’t ever change again. I hope you make the switch and keep getting updates!
A few weeks ago Tom Naughton from Fat Head posted a recipe for a low-carb gluten-free pizza that is just perfect. I have been making it twice a week ever since and it is real pizza, not some acceptable substitute. Don’t be scared off by the amount of cheese used to make the crust, it comes out sturdy and just like a flour based crust.
I have made a few changes and included some nutritional information which you may find helpful.
Ingredients
4 cups mozzarella cheese
1/2 cup of your favorite mixed cheese, like a Mexican, Italian or cheddar blend.
4 oz cream cheese
1.5 cups almond flour
1/2 cup of pizza sauce or spiced tomato sauce
Garlic salt
(Optional) Dried ground fennel
(Optional) Dried ground oregano
(Optional) Dried parseley
Steps
Preheat oven to 425 degrees.
Line a baking sheet with parchment paper. My recipe fills an entire 1/2 sheet pan.
In a microwave safe bowl, combine 3 cups (436g) of mozzarella cheese and 4 oz of cream cheese. Microwave and stir every minute until smooth and mixed.
Add some dashes of garlic salt, parsley, oregano and fennel. If you are short on spices, the only one that really matters (in my opinion) is the garlic salt… mmm salt!
Add 2 whole eggs and 1.5 cups of almond flour. Stir like a mad-woman until it is all mixed.
Dump out onto your lined baking sheet.
Now smoosh out the dough to make a crust. I like to put my hand in a sandwich bag and pour a few drops of olive oil onto it so that nothing sticks.
Lightly cover the crust with garlic salt.
Bake for 10 minutes. If you see major bubbles, feel free to attack them with a fork.
Continue baking about 4-6 minutes, until the crust fully cooked and slightly brown on top.
Add the pizza sauce, remaining cheese (1 cup mozzarella and 1/2 cup of cheese blend) and any toppings.
Shake out a wee bit more garlic salt on top… :)
Place back in the oven under the broiler for 2-3 minutes, until the cheese is melted and bubbly brown.
Remove from the oven and let it cool in a safe place (I use my cutting board). After 5 - 10 minutes it is ready to cut without causing a cheese landslide.
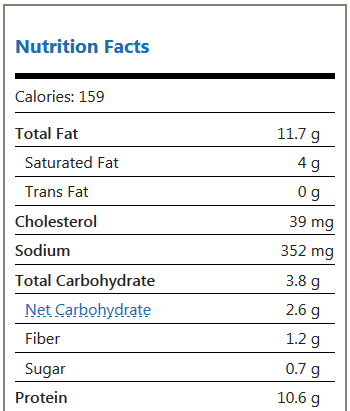
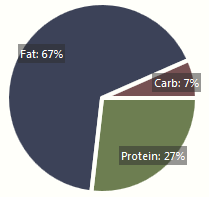
Nutritional Information
This makes 16 square slices, and I am quite stuffed with 4 slices, or ¼ of the pizza. So my serving clocks in at 15.2 g of carbohydrate (or 10.4g net). The nutrition info below is calculated using the recipe above, with just cheese for the topping.